

Hand-drawn text illustrations for Canvas
Give your Canvas pages some personalized humanization!
Let’s explore an easy way to create custom illustrated text effects for your Canvas course. I believe that any amount of personalization in an online course (or a traditional course, for that matter) has a lot of value because education is really about the relationships that are formed in the classroom. Any measure we can take to help humanize our content has merit. The contrary is that you don’t want students to think that their course content was generated by AI algorithms with no real thought for the student experience.
To the right is a animation of a sample course that has some of our customization. You can visit this course “in person” if you would like:
https://canvas.instructure.com/courses/2560052/pages/hand-drawn-illustrations-for-canvas
Let’s explore how to make our own custom hand-drawn illustrated text.

Let’s boot up PowerPoint
I chose to work in PowerPoint for this tutorial because it is probably the program that teachers most universally have access to. Of course you can achieve similar features utilizing other programs such as Keynote or Photoshop as well. Today we’re only looking at principles.
The first thing that I will do is to search for a stock icon, sticker, cutout, or illustration. You can find plenty of free illustrations online at sites such as drawkit.io or blush.design. I chose to pick illustrations from Microsoft using their stock imagery. In PowerPoint, select Insert >> Pictures >> and from the dropdown, click Stock Images… This will give you access to a library of high quality content. You can browse the full repository or select a topic to choose from.


You can modify the colors on the slide. Click the illustration then in the Graphics Format ribbon you can choose fill colors either from your theme color scheme (change your theme colors on the Design ribbon), or a custom color of your choice. You can even use the eyedropper tool to pull a color that is already on your slide.

The next step is to add your text. Start by inserting a textbox (anywhere on the screen). For this effect to work, you’ll really want to use some thick block fonts - and I would strongly suggest sans serif families. Some great fonts that work are Arial Black, Aharoni, Gill Sans, Articulate Extra Bold, Barlow Condensed, Impact, Montserrat Black, and perhaps my favorite, Intro Rust. Browse some of the font sites and find something that is very thick.


Here is where we are going to get clever. First of all, make sure that your text is exactly how you want it (check your spelling). What we are going to do is convert your text into shapes. Click on the Insert ribbon >> Shapes >> select a shape. Insert any shape onto your slide. It doesn’t matter what shape it is - rectangle, circle, triangle… Put it anywhere on your slide.

Next, with the shape selected hold Shift on the keyboard and click on the textbox. Now both the shape and the textbox should be selected and in the Shape Format ribbon scroll to the far left and find the Marge Shapes dropdown. On this list you will choose the option: Fragment. This will convert your text into separate vector shapes that can be moved and resized. You can now delete your inserted shape and delete any fills within the letters (such as the spaces inside the letters P, A, B, etc.).

With your individuals letter now converted to vector shapes, you can begin to customize their appearance. Select one or multiple letters and click on the Shape Format ribbon >> Shape Fill >> and what I do is select the Eyedropper tool and pick a color from the illustration that I imported.

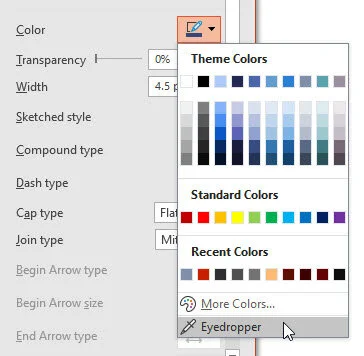
Now I want to adjust the shape outline, which is really where the hand-drawn illustration effect comes into play. Selecting at least one of the letters, I will right click (PC) and pull up the Format Shape… toolbox. Here I can adjust the outline (Line) settings. Play around with what looks good with your words, font, and size. In my example, I found that line width or 4 - 4.5 pt looked good. Next you’ll want to click on the Sketched style dropdown. I think the curved style is what I prefer, but play around with the other options. With the line thickness and sketch all set, you will just need to choose the color. I again use the Eyedropper tool and select something from the imported illustration. You can also use one of your theme colors or a standard color.


For a good effect, since the illustration I used was a circle, I inserted a circle on top of the illustration and copied the settings from my letters. I then deleted the fill so that only the online remained. The reason I can’t apply the outline directly to the illustration is because it would outline every component within the illustration (since it is actually made up of many small shapes and elements. Once I had the circle outline set and selected it and the illustration and grouped them together (Ctrl + G on the PC).


Make any final adjustments that you want before saving as a picture. You can manually space apart the letters, adjust the size of the illustration, resize individual letters, or touch up other aspects. What I then do is select everything on the screen and group them together. Now you are ready to save. Right click and click Save as Picture…


Instead of saving it as a PowerPoint slideshow or presentation, click the Save as type: menu and from the dropdown choose an image format. The most common formats are png, jpg, and gif. If you animated any of the elements then you’ll choose gif. What I would suggest is to save as a png so that the background will be transparent. This gives you more options of what you can do later on. A jpg image will not have any transparency, which means any empty space will be filled with white. With your images saves, you can upload them onto your Canvas pages. Again, to see a live example, visit the Canvas page:
https://canvas.instructure.com/courses/2560052/pages/hand-drawn-illustrations-for-canvas
Please consider subscribing to our YouTube channel for more Canvas tips and tricks. It is so easy and so free. The only thing you have to do is click this link: http://bit.ly/how2canvas
And follow us on social media
Twitter: https://twitter.com/HowToCanvas
Instagram: https://www.instagram.com/HowToCanvas
Facebook: https://www.facebook.com/HowToCanvas